Battery switch on travel trailer function is crucial for managing your RV’s power. Understanding how your battery switch works – whether it’s a simple 1-2-both or a more complex setup – is key to preventing dead batteries and enjoying worry-free camping. This guide breaks down the different switch types, proper usage, troubleshooting, maintenance, and important safety considerations. We’ll cover everything from basic operation to advanced electrical system integration, ensuring you’re confident in managing your travel trailer’s power.
This guide provides a comprehensive look at your travel trailer’s battery switch, from identifying its type and understanding its function to troubleshooting problems and performing necessary maintenance. We’ll delve into the intricacies of house and starting batteries, explaining how to switch between them safely and efficiently. We’ll also address the interconnection of the battery switch with other components of your RV’s electrical system, helping you understand the bigger picture of your trailer’s power management.
Battery Switch Types in Travel Trailers
Choosing the right battery switch for your travel trailer is crucial for managing power effectively and safely. Different switches offer varying levels of control and protection, so understanding their differences is important before making a purchase or upgrading your existing setup. This section will detail the common types, their internal workings, and their respective pros and cons.
Types of Battery Switches
Travel trailers typically use one of several types of battery switches to control the flow of power from your house batteries to the trailer’s electrical system and potentially to a second battery bank. These switches allow you to isolate batteries, connect them in parallel, or completely disconnect them from the system.
Single Battery Switch (On/Off)
This is the simplest type, essentially a single on/off switch for your battery bank. It’s straightforward, but offers minimal control.
| Component | Description |
|---|---|
| Switch | A simple on/off toggle or rocker switch. |
| Wiring | Connects directly to the positive (+) terminal of the battery bank and the trailer’s electrical system. |
Advantages: Simple, inexpensive. Disadvantages: Limited control, no isolation of batteries for maintenance or safety.
Dual Battery Switch (1-2-Both)
This switch allows you to select either battery 1, battery 2, or both batteries simultaneously.
| Component | Description | Component | Description |
|---|---|---|---|
| Switch Positions | 1: Connects only battery
1. 2 So, you’re planning a trip? Awesome! First things first: get yourself sorted with travel insurance. Check out Aon travel insurance for solid coverage. Then, think about your in-flight entertainment. If you’re an audiophile, you’ll want to check out audiophile travel setup guides to ensure your listening experience is top-notch, even at 30,000 feet. Proper planning makes for a smoother, more enjoyable journey! Connects only battery 2. Both Connects both batteries in parallel. |
Internal Contacts | Heavy-duty contacts to handle high amperage. |
| Wiring | Connects to both battery banks and the trailer’s electrical system. | Safety Features | Often includes a fuse or circuit breaker for overcurrent protection. |
Advantages: Offers flexibility to use individual batteries or both, allows for easier battery maintenance. Disadvantages: Can be slightly more complex to operate than a single switch.
Dual Battery Switch (1-2-Off), Battery switch on travel trailer function
Similar to the 1-2-Both switch, but with an “Off” position to completely disconnect both batteries from the trailer’s electrical system. This provides a crucial safety feature.
| Component | Description |
|---|---|
| Switch Positions | 1: Connects only battery
1. 2 Connects only battery 2. Off Disconnects both batteries completely. |
| Wiring | Similar wiring to the 1-2-Both switch, but with an additional break in the circuit for the “Off” position. |
Advantages: Improved safety due to the “Off” position, allows for complete isolation of batteries. Disadvantages: Slightly more complex than a single switch.
Battery Isolator
While not strictly a switch, a battery isolator is another common component in travel trailers with dual battery systems. It automatically switches power sources depending on the charging source (engine alternator or shore power).
| Component | Description |
|---|---|
| Diodes or Relays | Uses diodes or relays to prevent backfeeding between batteries and prioritize charging from the alternator or shore power. |
| Wiring | Connects to the alternator, shore power, and both battery banks. |
Advantages: Automatic charging management, prevents overcharging or draining of one battery. Disadvantages: Can be slightly more expensive than a simple switch. Some loss of power due to voltage drop across the diodes.
Proper Battery Switch Usage: Battery Switch On Travel Trailer Function
Understanding how to properly use your travel trailer’s battery switch is crucial for maximizing battery life and preventing costly repairs. Improper use can lead to premature battery drain, reduced performance, and even damage to your electrical system. This section will guide you through the correct procedures for various scenarios.
So, you’re planning a trip? Awesome! First things first: get yourself sorted with travel insurance. Check out Aon travel insurance for solid coverage. Then, if you’re an audiophile like me, don’t forget your tunes! Planning your audiophile travel setup is key to enjoying those epic playlists on the go. Make sure you pack accordingly to keep your precious gear safe and sound!
Your travel trailer likely has a battery switch that allows you to isolate or connect your house batteries (used for interior appliances) and your starting battery (used to start your tow vehicle’s engine). The specific type of switch (e.g., 2-position, 3-position, 4-position) will determine the exact switching options available. Always consult your owner’s manual for specific instructions related to your trailer’s setup.
Switching Batteries for Different Needs
This section details the proper steps for switching between batteries depending on your needs. Remember to always consult your owner’s manual for specific instructions related to your particular battery switch.
Before undertaking any battery switching operation, ensure you are working in a well-ventilated area. Always wear appropriate safety glasses to protect your eyes from any potential sparks or acid splashes.
- Running Appliances (House Batteries Only): In this scenario, you’ll want to isolate the starting battery to prevent accidental draining. This is typically achieved by setting the switch to the “House” or “Both” position, depending on your switch configuration. If you have a 2-position switch, you’ll usually find only a single “On/Off” setting.
- Starting the Engine (Starting Battery Only): Before attempting to start your tow vehicle’s engine, ensure the battery switch is in the position that connects only the starting battery to the vehicle’s electrical system. This will prevent draining the house batteries. Some switches have a “Start” position for this purpose; others might require you to set the switch to the “Off” position to isolate the house batteries before starting your vehicle.
- Charging Both Batteries: When connected to shore power (hooked up at a campground) or using a generator, the switch should generally be in the “Both” or “On” position (depending on your switch type) to allow both the house and starting batteries to charge simultaneously. This ensures both are fully charged and ready for use.
Step-by-Step Battery Switch Operation
Following a methodical approach ensures safety and correct operation.
The steps below are general guidelines. Always refer to your specific battery switch instructions for accurate operation.
- Identify your switch: Locate the battery switch, usually found near the batteries themselves or inside a storage compartment. Familiarize yourself with its positions and markings.
- Turn off appliances: Before switching, turn off all appliances and electronics connected to the house batteries to prevent unexpected power surges or drain.
- Select the desired position: Carefully move the switch to the position that corresponds to your intended use (e.g., “House,” “Start,” “Both,” “Off”).
- Verify the connection: After switching, double-check that the correct battery or batteries are connected based on your chosen position.
- Monitor battery levels: Regularly check the voltage levels of your batteries to ensure they are charging and discharging appropriately.
Tips for Maximizing Battery Life
Proper usage significantly impacts battery longevity.
Here are some tips to extend the life of your travel trailer batteries:
- Regularly clean battery terminals: Corrosion on battery terminals can impede charging and discharging efficiency. Clean them periodically with a wire brush and baking soda solution.
- Avoid deep discharges: Repeatedly discharging batteries to very low levels will significantly shorten their lifespan. Monitor your battery levels regularly and recharge them before they become critically low.
- Use a battery monitor: A battery monitor provides real-time information on battery voltage and state of charge, allowing for proactive management and preventing deep discharges.
- Equalize batteries (if applicable): Some battery types benefit from periodic equalization charging, which helps to balance the charge levels within the battery bank. Consult your battery’s manual for instructions.
Troubleshooting Battery Switch Issues
Dealing with a malfunctioning battery switch in your travel trailer can be frustrating, but with a systematic approach, you can usually pinpoint and fix the problem. This section will guide you through common issues and troubleshooting steps. Remember safety first – always disconnect the battery before working on any electrical components.
Battery switch problems usually manifest as a complete lack of power, intermittent power, or blown fuses. These issues stem from several potential sources, including the switch itself, faulty wiring, corroded connections, or even a blown fuse within the switch’s housing. A methodical approach to troubleshooting is key to quickly identifying the root cause.
Common Battery Switch Problems and Their Causes
Let’s explore the most frequently encountered problems and their likely causes. Understanding these possibilities will help you focus your troubleshooting efforts.
- No Power: This could indicate a faulty switch, blown fuse, corroded connections at the battery, switch, or appliance, or a problem within the wiring itself. A completely dead battery is also a possibility, of course.
- Intermittent Power: This often points to loose connections, corroded terminals, or a failing switch that makes inconsistent contact. Worn or damaged wiring can also cause intermittent power supply.
- Blown Fuses: A blown fuse usually indicates a short circuit somewhere in the system. This requires careful investigation to locate the short before replacing the fuse (otherwise, you’ll just blow another one!).
Troubleshooting Methods
A visual inspection is the first and often most effective step. Follow this with some simple tests to narrow down the problem.
Visual Inspection: Carefully examine the battery switch itself, looking for any obvious signs of damage, such as cracks, burns, or loose connections. Check all wiring connected to the switch for fraying, cuts, or corrosion. Pay close attention to the terminals – corrosion can significantly impede current flow. Similarly, inspect the battery terminals for corrosion and tightness.
Simple Tests: After a visual inspection, use a multimeter to test the voltage at various points. First, check the voltage directly at the battery terminals. If it’s low or nonexistent, the problem is likely with the battery itself. Next, check the voltage at the input and output terminals of the battery switch. A significant voltage drop across the switch suggests a problem with the switch or its internal fuse.
Finally, check the voltage at the appliances or circuits that aren’t working. No voltage here indicates a problem between the switch and the appliance, likely a wiring issue or a further blown fuse in the circuit.
Troubleshooting Flowchart
This flowchart provides a step-by-step guide to diagnose and resolve battery switch problems.
| Step | Action | Result | Next Step |
|---|---|---|---|
| 1 | Check battery voltage. | Low/No voltage | Charge or replace battery. |
| Normal voltage | Proceed to Step 2. | ||
| 2 | Visually inspect battery switch and wiring for damage or corrosion. | Damage/Corrosion found | Repair or replace damaged components. |
| No damage/corrosion | Proceed to Step 3. | ||
| 3 | Check fuse(s) in the switch. | Blown fuse(s) | Replace fuse(s) and check for short circuits. |
| Fuse(s) intact | Test voltage at switch input and output. | ||
| 4 | Test voltage at switch input and output. | Significant voltage drop across switch | Replace the battery switch. |
| No significant voltage drop | Check wiring to appliances/circuits. | ||
| 5 | Check wiring to appliances/circuits for damage or loose connections. | Damage/Loose connections found | Repair or replace wiring. |
| No damage/loose connections | Check appliance/circuit fuses (if applicable). |
Battery Switch Maintenance and Replacement
Keeping your travel trailer’s battery switch in good working order is crucial for reliable power. Regular maintenance prevents problems and extends the lifespan of your switch, saving you time and money in the long run. Neglecting maintenance can lead to corrosion, poor connections, and ultimately, failure of the switch, leaving you stranded without power.Regular inspection and cleaning are key components of a proactive maintenance strategy.
A faulty switch can cause significant inconvenience and even damage to your trailer’s electrical system. Therefore, addressing potential issues promptly is essential for preventing more serious problems down the line.
Routine Maintenance Schedule
A simple visual inspection should be part of your regular pre-trip checklist. Look for signs of corrosion, loose connections, or damage to the switch itself. Cleaning the switch should be done at least twice a year, or more frequently if you’re in a particularly humid or salty environment.
- Inspection: Check for corrosion on the terminals and the switch body. Look for any signs of physical damage, such as cracks or loose components. Ensure all connections are tight and secure.
- Cleaning: Use a wire brush to gently remove any corrosion from the terminals. A baking soda and water paste can help neutralize any acid buildup. After cleaning, apply a thin layer of dielectric grease to the terminals to prevent future corrosion. Always disconnect the battery cables before cleaning.
- Tightening: Check all terminal connections to ensure they are securely fastened. Over-tightening can damage the terminals, so use appropriate torque.
Replacing a Faulty Battery Switch
If your battery switch is consistently malfunctioning despite cleaning and tightening, replacement is necessary. Choosing the right replacement is important – ensure you select a switch with the same amperage rating as your original switch and the appropriate number of battery terminals.Before starting the replacement, you’ll need to disconnect the battery cables. This is a critical step to prevent accidental shorts and injury.
Failure to properly disconnect the cables can result in electric shock or damage to the electrical system.
Safely Disconnecting and Reconnecting Battery Cables
Properly disconnecting and reconnecting battery cables is paramount for safety. Always follow these steps:
- Disconnect: First, disconnect the negative (-) cable from the battery. Then, disconnect the positive (+) cable. This order minimizes the risk of accidental shorts.
- Reconnect: When reconnecting, reverse the process. Connect the positive (+) cable first, then the negative (-) cable.
- Tools: Use an appropriate wrench or pliers to loosen and tighten the cable clamps. Avoid using tools that could damage the cable terminals.
- Safety Precautions: Wear safety glasses to protect your eyes from sparks or acid spray. Use insulated tools to avoid electric shock. If you are uncomfortable working with batteries, seek professional help.
Battery Switch Replacement Procedure
Once the cables are disconnected, carefully remove the old switch from its mounting location. This may involve removing screws or bolts. Install the new switch, ensuring it’s securely fastened. Reconnect the battery cables following the safety procedures Artikeld above. After installation, test the switch to verify its proper operation.
Remember to always consult your trailer’s wiring diagram for specific instructions.
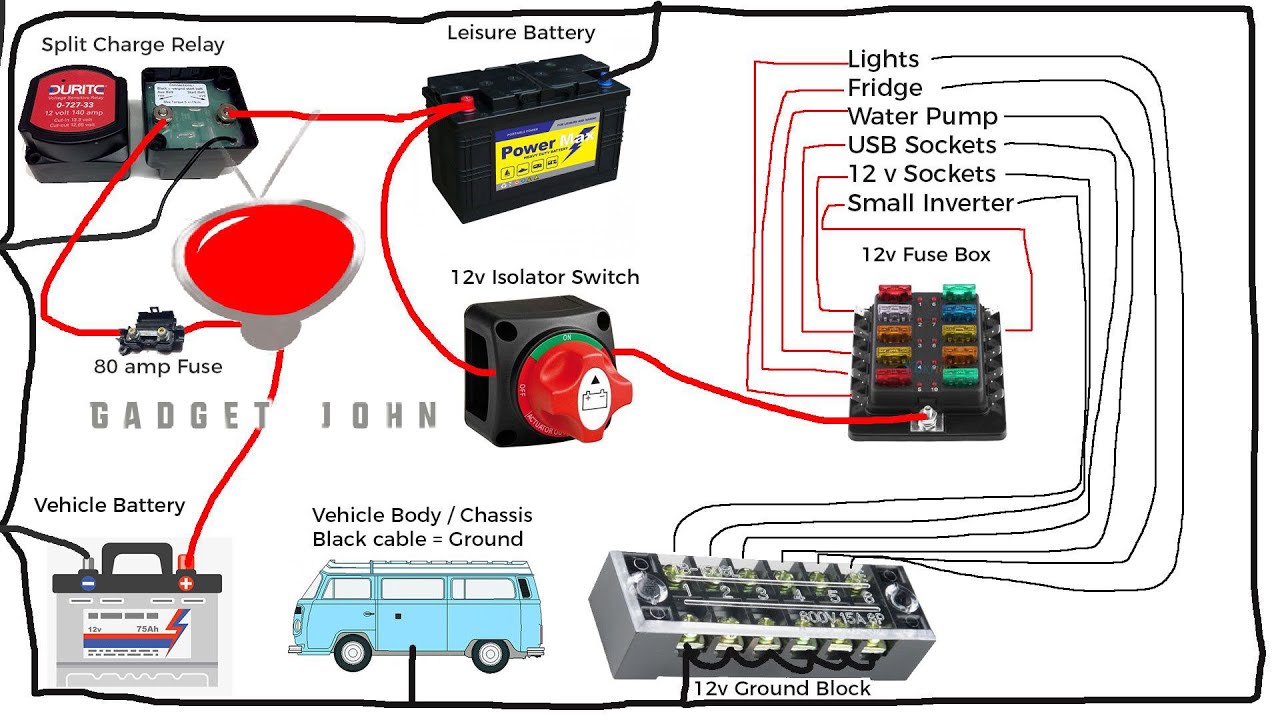
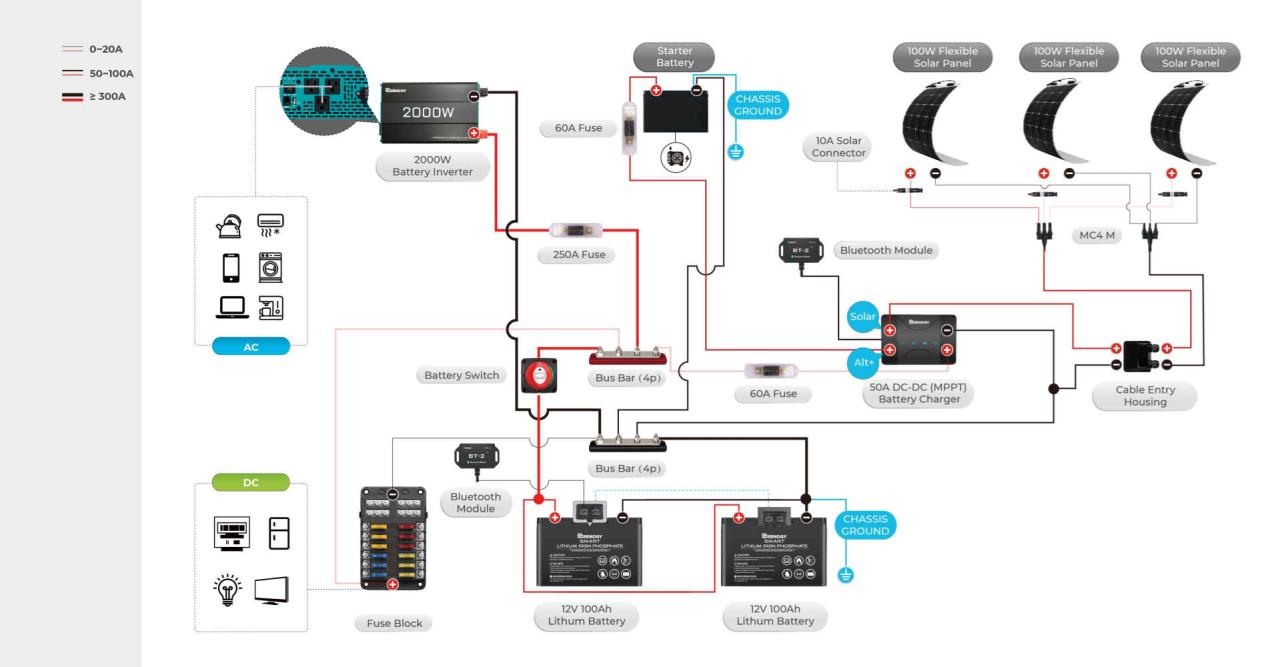
Battery Switch and Electrical System Integration
The battery switch is the central control point for your travel trailer’s DC power system, acting as a gatekeeper for the flow of electricity from your batteries to the rest of your electrical components. Understanding its relationship with other systems is crucial for efficient and safe operation of your RV. This section details how the battery switch interacts with key components like the converter, solar panels, and inverter, and how this interaction affects overall electrical system performance.The battery switch’s primary function is to isolate the house batteries from the rest of the electrical system.
This isolation is critical for safety, preventing accidental drain on the batteries when the trailer isn’t in use, and protecting against short circuits. However, it’s also a vital link in the chain of power distribution. The way you manage the switch directly impacts the charging and discharging of your batteries, as well as the availability of power to appliances and other devices.
A poorly managed battery switch can lead to premature battery failure, insufficient power, and even damage to other electrical components.
The Battery Switch and its Interactions with Other Electrical Components
The battery switch sits at the heart of the DC power system, interacting with several key components. The converter, for instance, typically draws power from the batteries to charge the 120V AC system. With the battery switch off, the converter is prevented from drawing power, thus protecting the batteries from unnecessary drain. Solar panels, if installed, feed power directly into the battery system, and the battery switch allows you to disconnect this charging source if needed for maintenance or troubleshooting.
Finally, an inverter converts the 12V DC power from the batteries into 120V AC power for appliances requiring AC electricity. The battery switch controls the availability of this DC source for the inverter.
Illustrative Diagram of Travel Trailer Electrical System
The following table provides a simplified representation of how the battery switch integrates with the major components of a typical travel trailer’s electrical system. Remember that this is a simplified representation, and actual systems may vary depending on the specific components and their configurations.
| Component | Description | Connection to Battery Switch |
|---|---|---|
| House Batteries | 12V DC power source for the trailer | Direct connection; switch controls power flow |
| Battery Switch | Controls power flow from the batteries to the rest of the system | Central control point |
| Converter | Converts 12V DC to 120V AC | Draws power from batteries via the switch |
| Solar Panels | Charge the batteries | Connects to the battery system, power flow controlled by the switch |
| Inverter | Converts 12V DC to 120V AC | Draws power from batteries via the switch |
| 12V DC Appliances (Lights, Fans) | Operate directly on 12V DC | Power flow controlled by the switch |
| 120V AC Appliances (Microwave, Air Conditioner) | Operate on 120V AC | Power derived from the converter, which in turn depends on the battery switch |
Safety Considerations with Battery Switches
Working with your travel trailer’s battery system involves potential hazards. Incorrect use of the battery switch can lead to serious consequences, so understanding and following safety procedures is crucial for preventing accidents and protecting yourself and your RV. This section will Artikel the key safety concerns and provide practical advice to mitigate risks.Improper use of a battery switch can result in dangerous electrical shocks or even fires.
A faulty switch, corroded connections, or accidental short circuits can create sparks that ignite flammable materials nearby, such as propane tanks or stored items. Similarly, touching exposed wires or terminals while the system is energized can deliver a potentially lethal electrical shock. These dangers highlight the importance of careful handling and adherence to safety protocols.
Electrical Shock Hazards
Electrical shocks are a significant risk when working with batteries and electrical systems. High-voltage batteries can deliver a powerful shock, potentially causing burns, muscle contractions, and even cardiac arrest. Always ensure the battery switch is in the “OFF” position before performing any work on the system. Never touch exposed wires or terminals while the system is live.
Use insulated tools and wear appropriate protective gear, including gloves and eye protection. If you are unsure about any aspect of the process, consult a qualified electrician.
Fire Hazards
Battery systems present a fire risk due to the potential for sparks, arcing, and overheating. Hydrogen gas, produced during battery charging, is highly flammable and can easily ignite. Always ensure proper ventilation around batteries to prevent gas buildup. Inspect battery terminals and connections regularly for corrosion, which can increase resistance and generate heat. Loose connections can also create sparks, so maintain tight and secure connections.
Keep flammable materials away from batteries and the battery switch area. Have a fire extinguisher readily available, preferably a type BC extinguisher suitable for electrical fires.
Essential Safety Precautions
Before working with your travel trailer’s battery system, it’s crucial to prioritize safety. Taking these precautions will significantly reduce the risk of accidents.
- Always disconnect the negative (-) battery terminal first, then the positive (+) terminal. This prevents accidental short circuits.
- Wear appropriate safety gear, including safety glasses, insulated gloves, and closed-toe shoes.
- Work in a well-ventilated area to prevent the buildup of flammable hydrogen gas.
- Have a fire extinguisher readily available.
- Never work on the electrical system alone. Always have a spotter present.
- Turn off the battery switch before performing any maintenance or repairs.
- Inspect all connections and terminals for corrosion and tightness before turning the system on.
- If you’re unsure about any procedure, consult a qualified RV technician or electrician.
Preventing Common Safety Mistakes
Many accidents can be avoided by following simple procedures and being aware of common mistakes.
- Never assume the battery switch is off. Always double-check its position before working on the system.
- Avoid working on the system in wet or damp conditions. Water can increase the risk of electrical shock.
- Don’t use tools with damaged insulation. Replace any tools with worn or frayed insulation.
- Never wear loose clothing or jewelry while working near batteries or electrical systems.
- Regularly inspect battery terminals and connections for corrosion and clean them as needed.
- Ensure that the battery box is properly ventilated.
Mastering your travel trailer’s battery switch is a fundamental skill for any RVer. By understanding the different switch types, employing proper usage techniques, and proactively addressing potential issues, you can ensure a reliable power supply for all your adventures. Remember to prioritize safety and perform regular maintenance to maximize the lifespan of your battery switch and prevent costly repairs down the road.
Happy travels!
Detailed FAQs
What happens if I leave my battery switch in the “off” position?
Leaving the switch off completely disconnects both batteries from the trailer’s electrical system. This prevents power drain but also means you can’t run any appliances or start the engine unless you manually switch to the correct battery.
How often should I clean my battery switch?
Inspect your battery switch at least once a year and clean it as needed. Dirt and corrosion can impede proper connection and create safety hazards.
Can I use a different type of battery switch as a replacement?
While you can replace a switch, ensure the replacement has the same amperage rating and terminal configuration as the original to avoid damaging your electrical system.
My battery switch is sparking. What should I do?
Sparking indicates a serious problem. Immediately disconnect the battery cables, and consult a qualified RV technician. This is a safety hazard.
